Introduction
This is a comprehensive guide to installing Arch Linux! Most linux installation guides, Arch linux not excluded, claim to aim towards brevity while failing to provide more detailed instructions for those who are either less computer literate or are simply new to Linux. The Arch Linux install guide (Which can be found here if you either don’t believe me or otherwise find this guide insufficient.) explicitly claims to be concise and advises would be users to reference the “man pages,” short for manual pages, of various programs. However, new users are likely to get confused by this jargon and will still not understand the purpose behind the commands and steps mentioned in the guide. This article is my attempt to remedy these issues.
Hardware Requirements
Arch can be installed via USB, CD, or over ethernet. If you’re capable of installing an OS over ethernet you have no use for this guide and, chances are, unless you’re a boomer or a based individual, you don’t have writable CDs. (Here’s a guide for creating boot media via optical drive in case you fall into either of these categories.) Fortunately the easiest and most convenient method involves the use of a USB flash drive, which you likely have lying around. You’ll need a drive at least as large as the Arch Linux ISO, which at the time of writing this guide is roughly 800MB. All of the data will be removed from this drive, so you’ll need to back it up if you wish to retain it.
Now you’ll need to obtain the Arch Linux ISO, which can be found here. Download the torrent if you’re familiar with them, or find an HTTP direct download nearest to you at the bottom of the page.
What’s next is dependent upon your present operating system: for Windows users, you’ll need a tool such as Rufus. MacOS users can use the built in terminal program diskutil.
Assuming you’re running Windows and you’ve installed Rufus, plug in your desired USB flash drive and open Rufus. Select the name of your USB drive from the “Device” list, select the Arch ISO you downloaded from the “Boot Selection” menu, and select GPT from the “Partition Scheme” menu. After you press start, select “DD Image Mode” and wait a few seconds for Rufus to reformat and write to your drive. Windows users can now shutdown their machines and skip to the next section of the guide.
If you’re on macOS, plug in your USB drive, open the terminal located in /Applications/Utilities/Terminal, and run the following command to list all storage devices currently recognized by the machine:
diskutil list
The path to your USB drive should appear with (external, physical) next to it. “External” drives, as opposed to “internal” drives such as the hard disks or solid state drives inside of your machine, correspond to devices plugged into external ports such as USB or eSATA.
The “physical” designator, as opposed to “virtual” which applies to RAM disks or RAID arrays, identifies a system disk as correlating to a physical device. Thus, your drive should resemble this output: /dev/diskX (external, physical). The name and size of the device will also indicate its path.
Next we’ll need to unmount the drive from the system in order to overwrite its blocks. In the terminal run the following command with X corresponding to the number of your drive:
diskutil unmountDisk /dev/diskX
Lastly, using the Data Duplicator (dd) command, we will write the Arch Linux ISO to our drive. Run the following in the Terminal:
dd if=path/to/archlinux-version-x86_64.iso of=/dev/diskX status=progress bs=1M
MacOS may attempt to remount the drive and open a dialogue box saying that “The disk you inserted was not readable by this computer.” Choose “Ignore” and shutdown your machine.
Boot from USB Drive
Our next step will be to select and boot from the USB drive. We’ll need to either enter the BIOS or the “Quick Boot” menu if your motherboard has such an option. The keys relating to these options often appear in either the top left or bottom right corners of the screen after your computer successfully posts (Power-on self-test). Open the “Quick Boot” menu, or the equivalent for your board, if it has one, or open the BIOS by holding down the appropriate key on your keyboard after it posts. For assurance, hold down the key as soon as you power on your machine. If your board does not display these keys, look them up in your motherboard manual. If you don’t know the name of your board, continue to reboot and try common BIOS keys such as F1, F2, F10, Delete, and Esc until you enter your system’s BIOS. If your computer has a dedicated boot or quick boot menu, select the name of your USB drive from the list. If you see your drive multiple times and your system is in UEFI boot mode, select the UEFI variant. Otherwise, choose the legacy option. This guide will assume you’re using UEFI, but cursory detail and external documentation will be provided for legacy users. If you’re in your motherboard BIOS, find the boot order menu or equivalent. If you’re unable to find this menu and you’ve managed to enter the BIOS, your motherboard name should be somewhere either on the BIOS home screen or top bar. Use this name to locate your motherboard manual online and navigate to the “Boot” section. Next, move your drive to the top of the boot order. Just as before, use “UEFI” if your drive appears multiple times. Before you proceed, ensure the following:
- Secure Boot is disabled (You can re-enable it following the installation.)
- Enable USB Boot
- Check your Boot mode again (Select UEFI if you’re unsure.)
Don’t fret if an option is unavailable on your machine. Press F10 to save and reboot your machine, or select the option to do so manually in the “Exit” tab if this hotkey does not work on your board.
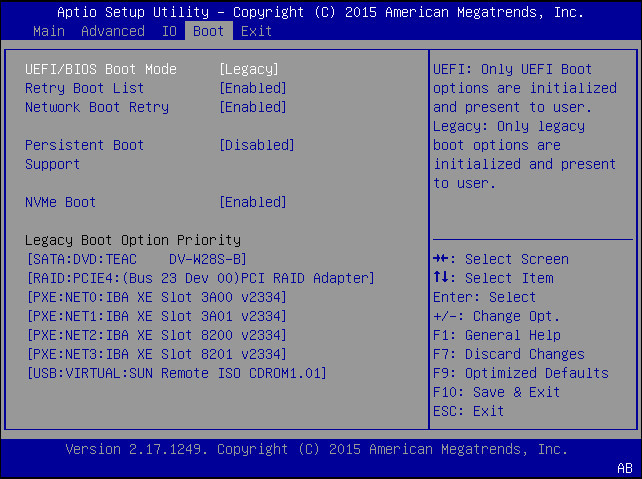 Here is an example of a legacy BIOS boot section.
If all has gone correctly you should be greeted with an Arch Linux splash screen. Simply press enter to boot into the installer! If you were able to reach the splash screen yet encountered a freeze or crash, ensure that your drive matches the boot mode of your system. If your system fails to identify the drive as being bootable, reacquire the Arch Linux ISO and go back through the previous sections of the guide (You will know if this is the case if your computer either explicitly tells you so or, assuming you moved your drive up properly in the boot order, your computer boots into another OS.).
System Configuration
Now begins the process of configuring your operating system. Firstly, we’ll want to set our keyboard. This is unnecessary for those on US keyboard layouts as Arch defaults to US, but if you use another type of keyboard execute the following command to list the available options.
ls /usr/share/kbd/keymaps/**/*.map.gz
Once you’ve located your layout, execute the loadkeys command just like the below example. You’ll of course need to replace “de-latin1,”
which corresponds to German, with your desired layout.
loadkeys de-latin1
You may find it desirable, or mandatory in order to more easily read, to modify the existing console font.
These fonts can be found in a similar directory to keymaps: usr/share/mds/consolefonts/ and can likewise be listed using the ls command as before.
An example of of selecting one of the largest fonts can be seen below.
setfont ter-132b
Now we’ll want to connect to the internet so we can eventually install the base package, kernel, and firmware. If you’re on an ethernet connection you will likely already have internet access but, just in case, type the following command to verify the functionality of your network interface:
ip link
The output should look similar to this image:
 Example of the output of
 ip link
Ignore the loopback interface, named lo, and look for other entries such as ethx, enpx2x, etcetera.
The UP contained within <BROADCAST,MULTICAST,UP,LOWER_UP> indicates that the device is working, not the state UP portion of the command output.
If your device is listed as down, execute the command:
ip link set your-interface up
Wi-Fi users will want to use iwctl to connect to their wireless network.
It is unnecessary for me to describe this process as the guide on the Arch website is highly accessible.
You should now be able to view the path, or route, to your router by running the bellow command:
ip route show
The first IP will be the gateway, or the router’s IP, and the second IP is what has been assigned, manually by you or automatically by
DHCP, to your machine. Here is an example from my machine:

ip route show output
You can now attempt to ping the outside internet, my website in this case, with a command like the one below. Substitute my website for another you know to work if you wish.
Press Ctrl + c if the output of the command does not stop automatically.
ping joshuadrake.org
Running the timedatectl command will show your local time according to your IP address, Universal time, the Real Time Clock of your system, your Time Zone, as well as whether or not your system clock is synchronized.
An internet connection is of course needed to allow for this to work.
timedatectl
We will now verify our boot mode. List the contents of the efivars directory by running the command below:
ls /sys/firmware/efi/efivars
If the directory and its contents are listed without error, your machine is in UEFI mode. Otherwise, your machine is booted in BIOS or CSM mode. Should this not be in keeping with your desired boot mode you’ll need to revisit your BIOS and the “Boot from USB Drive” section of this guide. We’ll proceed with the most important section of the guide assuming your boot mode is correct.
The most common way to view block devices, or what are essentially the partitions and their filesystems on particular drives, is by using the lsblk command.
Executing the lsblk utility with the --fs option (short for file system) will provide you with information about each block device such as its name, filesystem type, label, which should be empty on a fresh system; and mountpoint, which too should be empty on your fresh system.
lsblk --fs
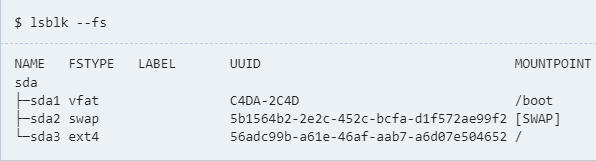
lsblk --fs example from here
Here is a short breakdown of the different types of block devices on linux machines: storage devices, shown as “sda, sdb, sdc, etcetera,” are those of interfaces such as PATA,
SATA, and USB Storage; NVM Express devices, shown as “nvme0n1, nvme0n2, nvme1n1, or nvme1n2,”
with the first number relating to the controller and the second to to the specific device on that controller, are explicitly SSDs connected via the NVMe interface;
MMC devices, shown as “mmcblk0, mmcblk1, mmcblk2, etcetera,” are those found on SD cards, MMC cards, and eMMC Devices;
Optical Disk drives are named “sr” followed by the number indicating the order in which the device was discovered by the system (“sr0, sr1, sr3, etcetera), with a symbolic link at /dev/cdrom to the first optical drive discovered by the system;
lastly, virtio block devices, essentially virtual block spaces, follow the convention of “vda, vdb, vdc, etcetera” with the last letter incrementing from “a” to the most recently discovered device.
WARNING: This guide assumes that you wish to start with a fresh system! Installing multiple operating systems is beyond the scope of this guide. However, a comprehensive guide can be found here.
Now that you’re familiar with the types of block devices we can proceed with creating the partitions for our system.
The fdisk utility provides an easy and unambiguous means of doing this. The below command will list the partitions on your machine as well as the devices that contain them.
fdisk -l
Use the “Disk Model” field to determine how your system has assigned directories to your drives. There are a few considerations regarding how to proceed with partitioning your system drives:
- The speed of your boot drive
- Your RAM quantity and whether or not your system will ever exceed it
- Additional Drives
If your boot drive, or what you will soon use as your boot drive, is slow, and you have your system is equipped with sufficient memory, you will not need a Swap partition. If the opposite is the case and you have a fast boot drive with a small quantity of RAM, a Swap drive will aid in your system’s performance. As you may have guessed, a Swap partition acts as additional space for your system in the event that its other memory resources are exhausted. If you have a concrete approximation of how much you’ll exceed your RAM in the most extreme of cases, use that as the size of your Swap partition. Otherwise I’d suggest having your RAM and Swap partition combine to total at least 16Gb. Swap partition aside, you’ll need an EFI partition if you’re going to be booting in UEFI mode, and the main linux partition to encompass the rest of the drive. The EFI partition is what your computer uses to boot into installed operating systems. I suggest allocating a minimum of 1Gb of space such that you can install multiple operating systems in the future should you want to. Proceed with sizing each partition by executing the bellow command:
fdisk /dev/the_disk_to_be_partitioned
Enter “m” just as you’re prompted to list all of the available fdisk commands. Briefly review each command and its description to learn their functions. You’ll find that fdisk is highly intuitive.
Enter “p” to have fdisk print out your drive’s current partition table. I’ll again warn you that this guide assumes you’re making a fresh system.
You’ll need to consult another guide for more complicated setups such as those of multiple operating systems, but I will provide you with advice to make this process easier if you wish to do so in the future.
Start by creating a new partition table: enter “g” if you’re making a UEFI system or “o” for a MRB table. Now we can add partitions. Enter “n” to create your EFI partition if you’re an UEFI user.
Make this partition the first one and make it 1Gb per operating system you intend to install (500Mb should suffice if you’re only installing arch.). Start at the lowest number block you can. Here is a useful excerpt from the fdisk manual regarding positioning of the “last sector:” “The ’last sector’ dialog accepts partition size specificed by number of sectors or by +/-<size>{B,K,M,G,...} notation. If the size is prefixed by ‘+’ then it is interpreted as relative to the partition’s first sector. If the size is prefixed by an ‘-’ then it is interpreted as relative to the high limit…”
Next create your Swap partition if you’ve decided it necessary. Enter “n” and make this partition 2 of the size you decided earlier. Lastly, enter “n” and fill as much of the remainder of the drive as you can.
If Arch is the only operating system you intend to install you can safely use the rest of the space on the drive. Otherwise, take up as much space as possible while allowing room for your other operating system.
MBR tables will exclude the EFI partition but will otherwise be the same. Now enter “t” to label your partitions. This will help you to easily identify how your table is set up in the future.
Alias 1 corresponds to “EFI,” 19 to “Linux Swap,” and 23 to “Linux Root x86-64.” Enter “p” again to print out your partition table to verify it. If all is well, enter “w” to write the table to your disk and exit.
Next we will format our new partitions with filesystems. These filesystems will allow the system to properly interface with data, whether it be written to or read from the drive.
Modern linux filesystems use ext4, and can be applied to your linux root partition by executing the below command.
If, for example, the disk you selected to partition in the previous step was assigned path /dev/sda, and you made your linux root partition number 3, your “root_partition” as in the command below would be sda3.
mkfs.ext4 /dev/root_partition
Initialize your swap partition, if you made one, by running the below command.
Just as before, if your disk is assigned path /dev/sda and your swap partition is number 2, “swap_partition” in the case of the below command would be replaced with sda2.
mkswap /dev/swap_partition
UEFI users will need to format their EFI partition. Interestingly, the EFI partition is formatted in FAT just like a flash drive. Replace “efi_system_partition” with the path to your disk and the partition number just as with the previous partitions.
mkfs.fat -F 32 /dev/efi_system_partition
You will be ready to download the linux kernel and firmware shortly. All you have to do is mount the filesystems you just created such that you can access them as if you were logging into your new system! Use the same path that you used in the previous step to format your partitions to mount them with the following command:
mount /dev/root_partition /mnt
If you have an EFI partition, mount it just as you did in the previous command, but enter the --mkdir option such that a new directory is made within /mnt called boot.
mount --mkdir /dev/efi_system_partition /mnt/boot
Lastly, activate your Swap partition using the below command and, just as with the previous steps, the same path for “swap_partition” as you used when formatting your Swap space.
swapon /dev/swap_partition
You are now ready to acquire the linux base package, linux kernel, and linux firmware! Simply enter the below command and allow a few minutes for the process to complete!
pacstrap -K /mnt base linux linux-firmware
The next step is crucial, and will ensure that your system will automatically mount the filesystems that you created when you boot into your new system.
genfstab will generate an fstab file which contains information such at the UUID of each partition, their mount directories, filesystem type, etc.
You’ll notice in the below image of the fstab file from my machine that I have numerous partitions including a network drive.
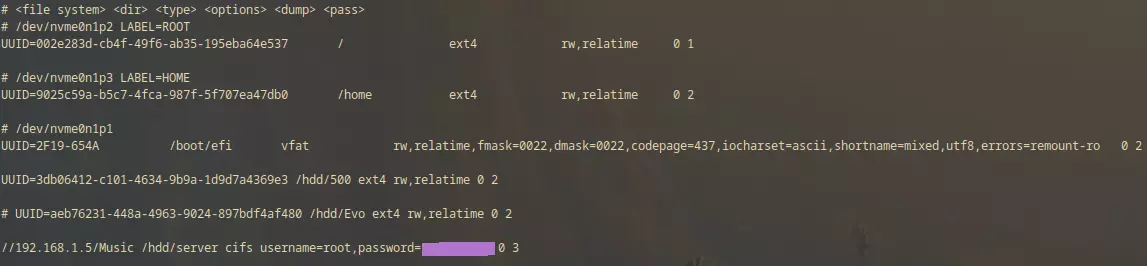 Here is an example of the fstab file from my PC. Notice you can even mount network drives!
You can add your own additional file systems at your leisure using this helpful page in the future. For now the below command will create an fstab file with the partitions you just created and will allow you to get your system running:
genfstab -U /mnt >> /mnt/etc/fstab
Running cat /mnt/etc/fstab will output the contents of the nascent fstab file to your console. Use this to verify that all of the partitions that you created are present.
You can now login to your system! Simply enter the below command with the mount point of the root filesystem.
arch-chroot /mnt
You should now be logged into the root directory of your new system.
The first thing we’ll do is install NetworkManager. In the absence of some form of network management software your system will not automatically connect to the internet upon booting.
pacman -S networkmanager
systemctl enable NetworkManager
You can use an alternative to NetworkManager if you’d prefer. The first of the above commands will use use pacman, Arch’s package manager, to acquire and install NetworkManager for you. The second command will tell systemd to run NetworkManager on startup. Ethernet will work by default upon boot, and Wifi will as well with additional configuration.
Now we’ll make sure that the BIOS or UEFI knows how to access our operating system. An interesting and simple explanation of how this process works can be found here, and alternatives to GRUB, the Boot Loader that we’ll be using in this guide can be found here. Run the below command to install GRUB, and omit efibootmgr if you’re on a BIOS system.
pacman -S grub efibootmgr
Now run the below command if you’re on a UEFI system. This will install grub to your efi partition.
grub-install --target=x86_64-efi --efi-directory=/boot --bootloader-id=GRUB
BIOS users will want to run this command instead. Savvy users may notice that their system architecture is “x86_64,” not “i386-pc” as specified in the target option of the command below. This may be true, but grub requires that this be the case for BIOS systems regardless of architecture.
grub-install --target=i386-pc /boot
Both UEFI and BIOS users will need to run the below command to make a configuration file that takes their operating system into account.
grub-mkconfig -o /boot/grub/grub.cfg
 Example of a successful configuration
The finish line is now in sight! The remainder of the commands we’ll be executing will be basic and intuitive. Firstly, create a symbolic link of the nearest area/city to your own to “localtime” in the /etc directory by running the below command. As you might have guessed, this will allow for your system and other applications to know what time zone to use.
ln -sf /usr/share/zoneinfo/Region/City /etc/localtime
Run hwclock as below to generate /etc/adjtime and sync the hardware clock from the system clock.
hwclock --systohc
Now you’ll need a text editor. Nano is highly accessable and easily to use, but VIM and VI offer increased usability at the cost of an initial learning curve. If you’re unsure, install Nano. Replace nano with your text editor of choice in the commands below if you chose otherwise.
pacman -Sy nano
Next, edit /etc/locale.gen and uncomment (delete the “#” at the beginning of the line) each local you need. For most users of this guide “en_US.UTF-8 UTF-8” and “en-US ISO-8859-1” will suffice.
nano /etc/locale.gen
Once you finish the process, generate the locales with the below command.
locale-gen
Next set the system locale to be used as the default for your system. Create the locale.conf file by executing the below command, then enter write the following line to it. en_US.UTF-8 is used as an example:
nano /etc/locale.conf

LANG=en_US.UTF-8
ctrl + o is the write command in nano.
To make the keyboard layout you selected earlier persistent, set KEYMAP in the /etc/vconsole.conf file to the input you passed to the loadkeys command (I used de-latin1 as an example if you recall, but you can run ls /usr/share/kbd/keymaps/**/*.map.gz again in case you’ve forgotten.).
nano /etc/vconsole.conf

KEYMAP=de-latin1
Now set your hostname. Set this name to be what you want your machine to be called on your network. Substitute “yourhostname” with the name you want in the command below:
nano /etc/hostname

yourhostname
To ensure that your hostname is resolved correct by all software, create a hosts file in the /etc directory by running the below command and adding the three lines below to it:
nano /etc/hosts

127.0.0.1        localhost
::1              localhost
127.0.1.1        yourhostname
Finally, enter a password for the root user after entering passwd as below. I recommend writing this down somewhere.
passwd
Exit your system, unmount your filesystem, and reboot by running the commands below.
exit
umount -R /mnt && reboot
Simply unplug or remove your installation media once your system powers off, and you computer should automatically boot into Arch! If this is not the case, return to your BIOS and ensure that your boot order is correct.
Post Installation
For most new users I suggest running a bootstrapping script to provide them with a basic setup with a few programs to help them get started. What I recommend, and used myself for a while, is Luke Smith’s Auto-Rice Bootstrapping Script. Simply follow the instructions he provides. However, if you’re a GigaChad, you can use these General recommendations and this List of Applications to create your own custom setup!