Introduction
After the completion of the electric trencher it became clear that a more pragmatic implementation of battery technology was needed.
The trencher performed incredibly well and had upsides over internal combustion engine equivalents, but it had drawbacks.
These drawbacks include being constantly at full load making regeneration and the efficiency gains of electric minimal, long down times for recharging the battery pack,
and necessity of proximity to electric power. We do have plans to aleviate some of these issues through the development of swapable battery packs or a hybrid power plant, but
we concluded that we needed to create a machine that was more practical to be battery powered. This spawned the eUtil project, an electric, articulating utility vehicle.
My contributions to this project were almost the same as they were on the trencher project, but with changes in accordance with architectural differences.
This machine has a dedicated controller, hydraulics, more complicated controls, and additional inverters when compared to the trencher.
Thus I handled the display programming, user interface, and embedded controller programming for the project.
Machine Controller
The versitility of this machine necessitated the creation of some involved state machines, such as for the driving modes, different attachments, and hydraulic circuit configurations.
Unfortunately, the nature of code is that it's difficult to create a visual illustration of it beyond simply taking screenshots, particularly in cases such as this one where the outputs of the machine controller are
purely control messages and signals. However, I can at least describe how my code functions.
My first and most important task in regards to the machine controller was to take my battery control code and convert it from Qt specific C++ to C.
This machine uses the same batteries that were employed on the trencher, so I was familiar with how to interface with their BMS (Battery Managment System). I entered all of the requried
J1939 CAN messages into the controller's CAN database, wrote a state machine for all of the possible
operating states that the battery could be in, added the necessary conditions to switch between states, and populated said states with the appropriate signals and messages. After the controller was able to properly manage the battery,
I went about implementing the swappable attachment functionality.
Display
Unfortunately, new images weren't created for this machine, so most of what I implemented was done textually, or with basic images that I made myself.
I had envisioned screens that changed in accordance with driving mode, attachment, etcetera, but ended up having to reuse the same, singular image from the trencher project...
To describe the process of repurposing old images would be boring to read and irritating to write, so I'll briefly highlight the new features I developed for this display.
I realized that I am likely to need "Engineering Pages," essentially tables to list the parameters of the a particular machine's various devices and controllers, on all of my prototypes.
This realization, couppled with the tedium of having to manually create each page, motivated me to create a class to programmatically generate them. My code can be found here.
It has two constructors, once which creates a placeholder page without data, and one which populates the table with a title and parameter names during intitialization.
The page is then styled in accordance with my CSS, which can of course be customized if you'd like to use my code. Data can be updated through a myriad of methods, on an invidual basis, or all at once.
The text is automatically scaled with the size of the elements which contain it, and will even scroll in the event that it doesn't fit.
The last major element of this display that I developed is a simple selection page. Attachments, ground drive modes, and steering modes are all selectable from the display, and follow the format in the image below:
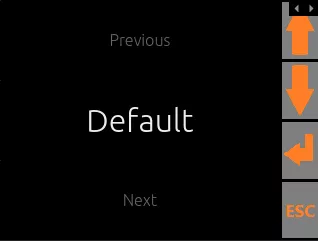
Obviously the placeholder texts of "Previous," "Default," and "Next" are all different depending upon the page in question. For example, the ground drive selection page has seven different options, starting with "Standard," "Skid Steer," and "Pivot Front."
Pressing the up and down keys cycles through the various options, while the enter key sends a message to the display requesting to update the mode in question.
The machine controller will send a response message back to the display depending upon whether or not the selection is approved. If the message is approved, the new mode or attachment will become highlighted in orange.
Otherwise, the color will go unchanged.